Month: September 2011
– Ornate chair
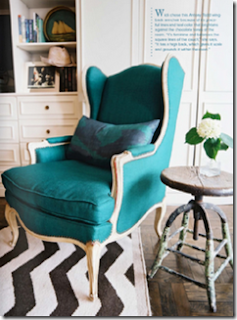
So back to my project, 4 different chairs for the kitchen table, one paint color and one fabric like I mentioned here. I can go a little crazy in the kitchen that is OK 🙂
I bought an old ugly Burgundy chair, yes it was a very shiny burgundy chair, but I liked its ornate and carved details.
I didn’t sand it, I just used Kiltz Spray Primer ( or Zinsser), then I paint it with “Valspar Aqua Ocean paint”. Then I realized that the ornate top that I fell in love with is loose 🙁
This is what happens when you are so excited and you don’t pay attention to how sturdy is the piece that you are buying. To fix it I used “Elmer’s Wood Filler” and “Gorilla Super Glue”. Lightly sand the wood filler and paint over it.
| After priming it |
– Bye Bye IKEA Hello Macy’s
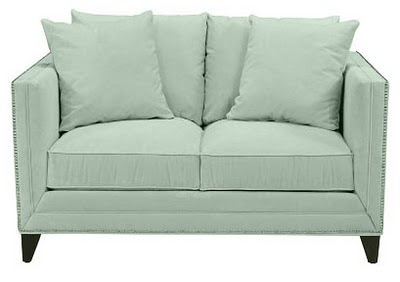
Last year the husband and I went shopping for a sofa. I fell in love with the blue Loveseat at Macy’s called ” Jaqueline Loveseat ” especially the nail head trim but my husband didn’t like it at all, so I had to search for another alternative 🙁
We ended up buying an off-white loveseat at IKEA, and I added some blue throw pillows and accents pieces to have this hint of blue in the room.
 |
| Ours with darker legs |
This was a year ago, but I kept on thinking about the Jacqueline Loveseat, so Yesterday I had an idea how to make this IKEA a Macys:
I bought Upholstery Nails at Home Depot (5 boxes) for $1.30 each.
This is the before:
How to apply the Nails was so easy, since I didn’t have the proper tools: the mallets and needle nose pliers, I used what I had in hand: Hammer and Scissors.
I hold the Nails in place with the scissors ( instead of the needle nose pliers) and then pound them gently with the hammers ( instead of the mallets). To have an equal spacing between each nail I had to use a spoon handle ( check out the below picture)
So finally I got to say BYE BYE IKEA HELLO KITTY..hmm I mean HELLO MACY’S
And hey dont forget to enter this amazing giveaway to win a $30 Gift Card from the online fashion store RuleHim so quickly go check it out
Featured :


Linking to :
notjustahousewife , nominimalisthere , skiptomylou , iheartnaptime , thegirlcreative , beyondthepicketfence , pollywantacrafter , somedaycrafts , beyondthepicketfence , theshabbycreekcottage , frenchcountrycottage , diyshowoff , tipjunkie , shabbynest , cookienut , thetrendytreehouse , funkyjunkinteriors , chattychicssassysites , thekurtzcorner, sugarbeecrafts , abowlfulloflemons , mommybydaycrafterbynight , projectqueen , tipjunkie , sweetlittlegals , primitiveandproper , cleanandscentsible , bluecricketdesign, kammyskorner , modvintagelife , restoreinteriors ,thriftydecorchick , insidebrucrewlife , elizabethandco ,
diybydesign , thevintagefarmhouse , craftyscrappyhappy , staceyembracingchange , knickoftimeinterior, twindragonflydesigns , diybydesign , thetrendytreehouse, shabbynest , daysofchalkandchocolate , findingfabulousblog , mommybydaycrafterbynigh , twindragonflydesigns , thetrendytreehouse , mysimplehomelife , shabbynest , romantichome , herecomesthesun , pollywantacrafter , bystephanielynn
– Pop of color: Aqua
The Kitchen table is where I spend all the daytime ( not eating, well not only eating but also as my office )
So I want something fun, comfortable and stylish.
I needed 4 chairs, I had in mind that I want 4 different style chairs, paint them one color, use one fabric.
So this is my first chair:
Not so pretty right
Read More
– Easy Canvas
Well, I wanted some artwork in my Guest Bedroom to cover that ugly yellow/beige wall.
I didn’t want to paint because we are renting and I already painted the dining room, the formal living room, and my master bedroom so enough paint since I have to re-paint all those walls alone like I promised my husband.
So back to the wall art, I wanted a black white and blue art. And whenever you have something specific on your mind you can never find it.
So I had to improvise: White canvas, blue paint, Rub’ N Buff and a black wall decal
-First, I painted the white canvas with my blue paint I already had ( I have an accent wall color blue in my dining room)
-Second, waited for it to dry then transferred the wall decal to the canvas.
-Third, I created a frame effect with silver Rub N Buff.
Et Voila:
– Brassy Candle Sconces
Those brass old sconces needed definitely a face lift spray paint “Rustoleum Flat Black”.
So my best friend showed up ( the spray paint) and one coat, two coats, three coats and done.
– Spray Paint Without Sanding
I hate sanding, I always wished that there is a way to paint without sanding. After some research, I found this easy way to spray paint without sanding: It is simply by applying an oil-based spray paint primer like: Zinsser.
Here is my before picture, I just wiped my nightstand from dust.
Then I applied my spray paint primer . After the primer is dry, I lightly sand it with a fine grid sanding wedge to get a very smooth finish.
Now time for spray paint, I used Rustoleum Black Gloss, I wanted to have a glossy surface so my nightstand doesn’t look dull in front of my shiny silver leaf dresser. I applied almost 3 light coats of black spray paint. ( always 2 or 3 lights coats are better than 1 heavy coat, like the nail polish concept).
| I forgot to take picture with just the primer on 🙂 |
Since I didn’t distress the nightstand I wanted it to have some movement, so I chose the pulls to be silver so they can pop. I used “Rustoleum Metallic Silver”.
THANKS FOR YOUR SUPPORT.
I’ve been featured :
Linking to : firefliesandjellybeans remodelaholic , thekurtzcorner , thriftydecorchick , bedifferentactnormal , iheartnaptime , thegirlcreative , shabbynest , missmustardseed
twenty-eight-0-five , creatingahouseofgrace ,knickoftimeinteriors , kammyskorner
– Spray Painting Mirrors 2
I’m obsessed with mirrors and vintage candle holders.
I’ve been searching for a nice mirror for my formal living room for ever, I didn’t find what I had in mind ( it looks that what I had in mind is either so rare either so expensive) so I settled for something else :).
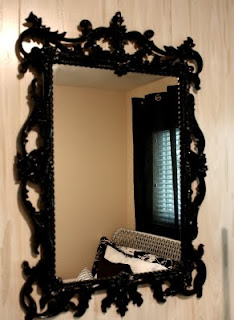
What I wanted is something like this below mirror
And this is what I found , I couldn’t wait more I had to had a mirror on that empty wall, and if later I will find a mirror like the above I will buy it and this one will find a new wall 🙂
And here is how it turned out to be
All I had to do is:
– First I removed all the staples in the back with my professional tools, to remove the mirror form the frame.
– Second wipe of dust from the frame so the spray paint will stick.
– Third just use your favorite spray paint color mine is “Rustoleum Metallic Silver”, and to get a smooth finish spray two light coats.
– Fourth reverse step first, put back the mirror to its place and staple it.
And that is it, I can’t wait to see your spray paint projects soon 🙂
Linking too itssoverycheri ,missmustardseed, dittledattle , thekurtzcorner , remodelaholic , thetrendytreehouse , primitiveandproper , thriftydecorchick , thriftydecorchick, bluecricketdesign , modvintagelife
– Spray Painting Mirrors
The Easiest project ever : Spray Painting Mirrors.
I just cleaned the frame from dust then I unscrewed the mirror from the frame ( or you can just cover it) and I sprayed the frame.
I love ornate Mirrors and I had to have one.
This beauty was hung in the guest bedroom here.
Linking too lifemadelovely
– My Mom’s Paintings
My mother is a very talented and creative woman. She sews, paints, decorate, and even bake. I believe I got my creative or artistic side from her. I love my mom.
I post some of her artwork for you to enjoy.
After seeing these beautiful painting, I would love to hear whose genes are in you?


